To make a word cloud, open a free word cloud generator in your browser, type or paste the words you want, pick a shape to fill, make your most important words bigger, then download the picture to print or post. The whole thing takes a couple of minutes, no sign-up, and no design skills. This guide walks you through it step by step with a free word cloud generator, plus the small tricks that make a word cloud actually look good instead of like a jumble.
What is a word cloud?
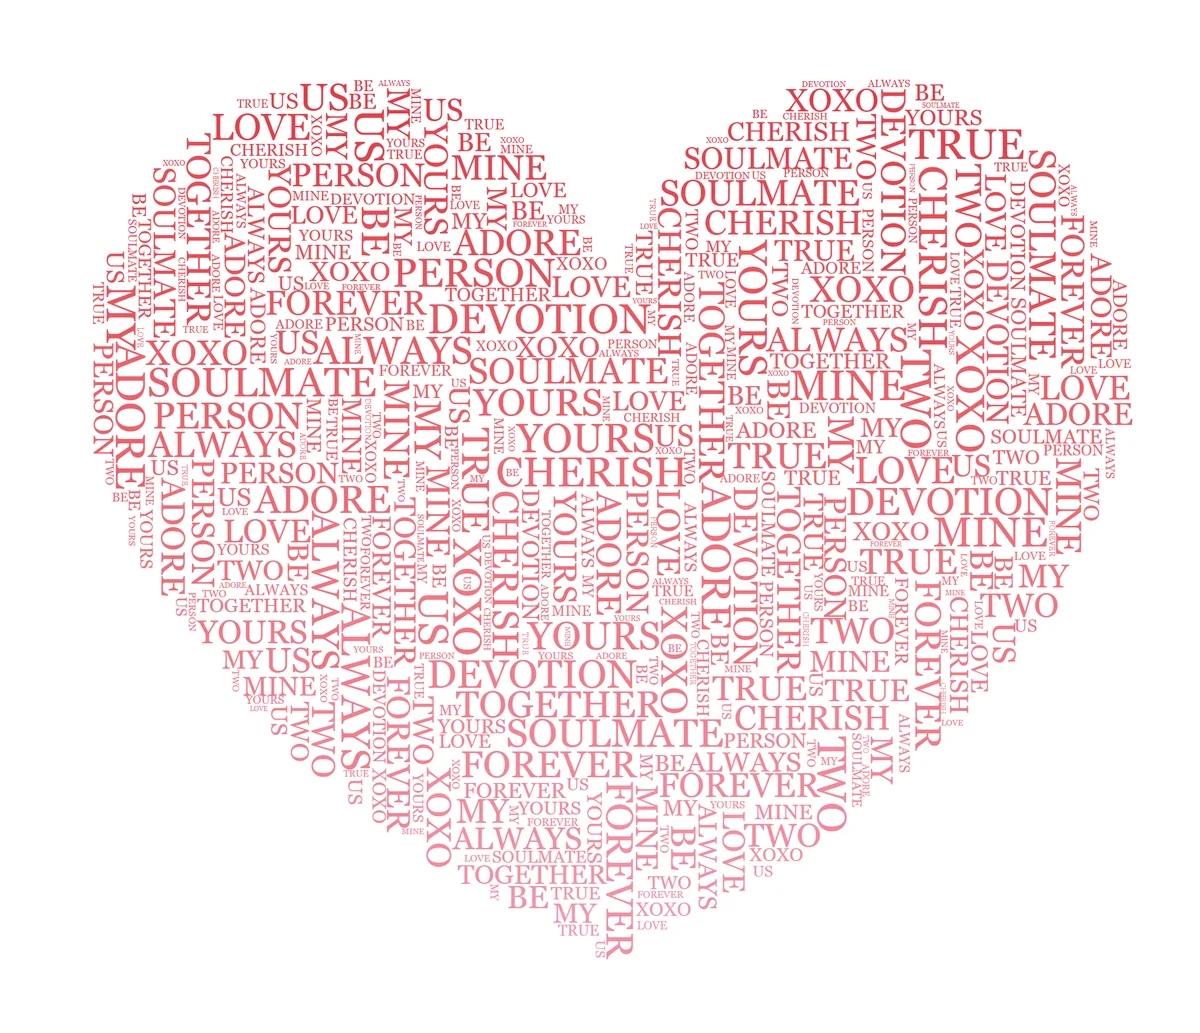
A word cloud is a picture made of words. The words you use most — or the ones you mark as important — show up bigger, and the rest fill in around them. You have probably seen them as gifts, classroom displays, retirement cards, and social posts: a heart filled with a couple's favorite memories, a star packed with a team's names, a country map made of city names.
There are two reasons people love them. From across the room, a word cloud reads as a shape. Up close, it becomes a list — every word a little detail worth reading. That double payoff is why a word cloud makes a better gift than a plain printed quote. (It's the same instinct behind word art in general; if you're deciding between the two looks, text art vs. word clouds lays it out.)
Make a word cloud in 5 steps
Here is the fast path using TextShape's word cloud generator. It works the same on a phone or a computer.
- Open the editor and clear the sample text. Nothing to install, no account. Just a box for your words and a preview that updates as you type.
- Type or paste your words. A list of names, a paragraph of a speech, a bunch of favorite things — anything. (More on what to put in below.)
- Pick a shape. Choose from around 200 ready-made shapes — hearts, stars, animals, speech bubbles, country maps — or upload your own picture or logo.
- Make the important words bigger. Type a
*right before a word, like*MOM, and it shows up large everywhere it appears. Do this for two or three anchor words, not twenty. - Set colors, then download. Pick a color scheme and a font, then download a high-resolution image. Done.
That is the entire process. The rest of this guide is the "do this, not that" advice that makes the difference between a cloud that looks like the shape and one that looks like a blob.
Step 1: Choosing your words (this is the real work)
The tool is fast. Your word list is where the magic actually lives, so give it five real minutes.
The single most useful rule: more, shorter words fill a shape better than a few long ones. A handful of long phrases leaves awkward gaps and big empty corners. Lots of short words — names, single descriptive words, places — flow into every nook and make the shape read clearly.
Two easy ways to build a list:
- A pile of words. Great for gifts and keepsakes. For an anniversary heart: both names, your wedding date, the city you met in, your song, kids' and pets' names, inside jokes. Aim for 20–50 entries.
- A block of text. Paste in a speech, a set of survey answers, song lyrics, or a chapter. To have the most-used words grow automatically — so the themes rise to the top on their own — turn on the Word cloud — size by frequency option. It lives in the Packed layout's options (pick Packed in step 4, then tick the box). With it on, filler words like "the," "and," and "of" are skipped, so they don't drown out the meaningful ones. Leave it off and every word comes out the same size. This is the setting that makes a word cloud a word cloud — it's referenced a few more times below, and this is the one place it's fully explained.
A quick gut-check for gift lists: if a word could appear in a stranger's cloud, it only earns its spot if it is true; if it could only appear in this one, it belongs automatically.
Step 2: Getting it into a shape
This is where a word cloud stops being generic. A blob of words is fine; a blob shaped like a dog your family recognizes is a gift.
Use a ready-made shape. The quickest route. Browse around 200 options — open the heart or star directly, or scan the full shape library. The text pours in and fills the outline edge to edge.
Here's what that looks like in practice. Pick the heart, switch to Packed, star one name, and feed it a short, repeat-friendly list:
*EMMA · always · home · forever · us · laughing · road trips · 2019 · coffee · sunday · always · home
Even with a dozen short words, the heart fills edge to edge: EMMA sits large in the middle, and the small words pack into the curves and the point. Add more and it only gets denser.
Or upload your own picture or logo. A pet's silhouette, a company logo, the outline of your home state. One thing to know here, because it trips people up:
A cut-out picture (one with a see-through background) works best. If your picture has a background, tap Remove Background and you are set — there is also an erase brush to clean up any leftover bits.
That one tip saves the most frustration. A photo with a busy background confuses the shape; a clean cut-out fills beautifully.
Step 3: Make the right words stand out
A word cloud with no standout words makes everything compete, and the eye does not know where to land. You have two ways to size things up, and they work together:
- Star a word. Put a
*in front of it (*GRADUATE,*2025) and it renders large everywhere — the most reliable way to pick your headline by hand. This is the same trick from step 4 above; here it is just worth knowing it works in both layouts, Flow and Packed. - Let frequency size the rest. If you built your list from a block of text, the Word cloud — size by frequency option from Step 1 grows your most-used words automatically. Want a word to loom larger without starring it? Just use it more often in your text.
Think of it like a poster: a couple of big words you read instantly, and smaller words forming the texture around them.
Step 4: Two looks — which one do you want?
There are two layout styles, and picking the right one is the difference between "read it" and "wow."
| Look | What it does | Best for |
|---|---|---|
| Flow | Lays words in tidy lines that follow the shape's outline. Readable in order. | Quotes, vows, lyrics, a short letter — anything meant to be read top to bottom. |
| Packed | Interlocks words at different sizes into a dense, classic word-cloud fill. Biggest words land first, small ones fill the gaps. | A pile of names, dates, and favorite things. The look most people picture when they say "word cloud." |
Quick rule: reading it in order → Flow. A collection of words → Packed. (Frequency sizing, from Step 1, lives in Packed.)
A few more touches that help, all in the Packed options:
- "Mixed" orientation lets some words turn sideways to fill tricky corners and tight edges, so the silhouette reads cleanly.
- Invert — fill around the shape. Flip this on and the words fill the space around your silhouette instead of inside it, leaving the shape itself as a clean cut-out in the middle. It's a striking look for a logo or a single bold letter — the negative space becomes the picture.
- Reshuffle and keep. Not loving the arrangement? Hit Shuffle layout for a new one — and because the tool is reproducible, you can settle on the version you liked instead of losing it. Shuffle a few times, pick a favorite.
Step 5: Colors and font
Colors set the mood. You have three options:
- A gradient — a smooth fade from one color to another. Easy and always looks intentional.
- A ready-made palette — a curated set where each word picks a color from the group. A calm 2–3 color palette frames better than a rainbow.
- Colors pulled from your own picture — handy when the cloud needs to match a logo or a photo.
You can use any Google Font. A script or serif leans elegant and romantic; a clean sans-serif leans modern and reads well when words get small. If very thin script letters start disappearing in the tiny words, switch to something a touch bolder.
Step 6: Download it to print or post
When it looks right, download a high-resolution image — up to 4K (3840 pixels on the long side), which is plenty sharp for prints. You can save it three ways:
- Transparent (no background) — so you can drop it onto colored paper or layer it over a photo.
- On a solid color — the safe choice for framing.
- Over your original picture — the words sitting on top of the image you started from.
There are also one-tap sizes for social media, so your post fits Instagram or a story without cropping. One reassuring detail: the download looks exactly like the screen — no surprises after you hit save.
For printing, match the size to your frame. At a 4K export's 3840 pixels, you stay above the 300-dpi mark print shops like up to roughly 12–13 inches on the long side — large enough for most framed gifts and wall prints, and still clean as bigger art viewed from across the room. Matte or satin photo paper flatters word-based prints and cuts glare behind glass.
Want it to move? Export an animated reveal
If the cloud is heading for a phone screen — a Reel, a story, a birthday text — you can download it as a short animation instead of a still. In the export panel, switch to the Animation tab and pick a style: words can pop in biggest-first, rise up and fade, or (in Flow) appear line by line in reading order. Choose a 4-, 6-, or 8-second clip and save it as an MP4 or a looping GIF. Same cloud, now with a little motion that earns a second look in a feed.
A quick honest comparison
Plenty of free word cloud makers exist (and there's a fuller free design tools comparison). Here is where this one genuinely differs, in plain terms:
- No sign-up, no watermark, no limits. You are not handing over an email or paying to remove a logo from the corner.
- It actually fills the shape. The words pack tightly to the outline, so a heart looks like a heart — not a rough cloud that vaguely gestures at one.
- It works on your phone. Start on the couch, finish on a laptop, or do the whole thing on your phone.
- Your stuff stays on your device. Your words and pictures are not uploaded to a server, which matters when the text is a love letter, a private list, or a baby's name.
- Reshuffle without fear. You can try new arrangements and keep the one you liked, instead of gambling on a single random result.
Common beginner mistakes (and the fix)
- Too few, too-long words. Result: empty gaps. Fix: add more short words, or break a phrase into single words.
- Starring everything. Result: nothing stands out. Fix: star only your 2–3 anchor words.
- Expecting a pasted speech to auto-size itself. Result: every word comes out the same size. Fix: switch to Packed and turn on Word cloud — size by frequency (explained in Step 1).
- A photo with a background as the shape. Result: a muddy outline. Fix: tap Remove Background first.
- Picking Flow for a name pile (or Packed for a poem). Fix: collection → Packed, read-in-order → Flow.
- A rainbow of colors. Result: noisy. Fix: a 2–3 color palette or a single gradient.
Try it now
That is everything you need. Jump into the free word cloud generator, or start straight from a heart or star and browse the rest of the shape library. Type your words, star the two or three that matter most, pick Flow or Packed, shuffle until it clicks, and download — as a picture or a short animation. Free, private, and entirely in your own words — which is exactly what makes a word cloud worth keeping.